Digital property theft is increasingly common, and statistics aren’t showing a declining trend. Perhaps the primary reason people use photos and videos that they aren’t authorized to use is that they’re unaware of the rules and regulations guarding the use of digital media.
If you do photography professionally or just as a side hobby, you’ll understand how painful it is to see your photos get stolen online. While there aren’t many ways to combat this, one of the most effective ways is by marking your photos with your name.
Since most amateur photographers stick with their iPhones for basic photography, it only makes sense to learn how to make a transparent watermark on iPhone. In this article, I’ll show you the step-by-step process necessary for making a transparent watermark on your iPhone.
How to Make a Transparent Watermark on iPhone
Watermarking shouldn’t have to be necessary if everyone could simply agree to use only images that they were permitted to use. But since we’re on the internet, it’s pretty unrealistic to have such wild expectations of people, especially regarding the use of their digital property.
In short, you’ll need to make watermarks for most of your images, especially those you’re posting to digital platforms like Facebook or Instagram. To prevent the watermark from ruining your image, make it transparent and almost invisible.
While a transparent watermark won’t magically prevent everyone from using your image illegally, it will discourage people from using your image illicitly. Besides that, people that see your image will know that you’re the owner, bringing you more visibility.
Here are some ways by which you can add a transparent watermark to your photos on an iPhone.
1. Using the Photos app
The built-in photo management app on the iPhone lets you watermark your photos easily with no external app. However, it misses many features that most other apps provide, making it preferable to most people to simply use something else for the task.
If you’re not a fan of using external apps on your iPhone, you might check out the watermarking features of your iPhone’s Photos app. You can only rely on this app if you don’t need to watermark an image now and then.
Here are some steps required to watermark an image using the Photos app available to all iPhones, iPads, and iPod Touches.
- From your iPhone’s home screen, navigate to the Photos app and open it. You should already know how it looks, especially if you’ve been using your iPhone for quite some time.
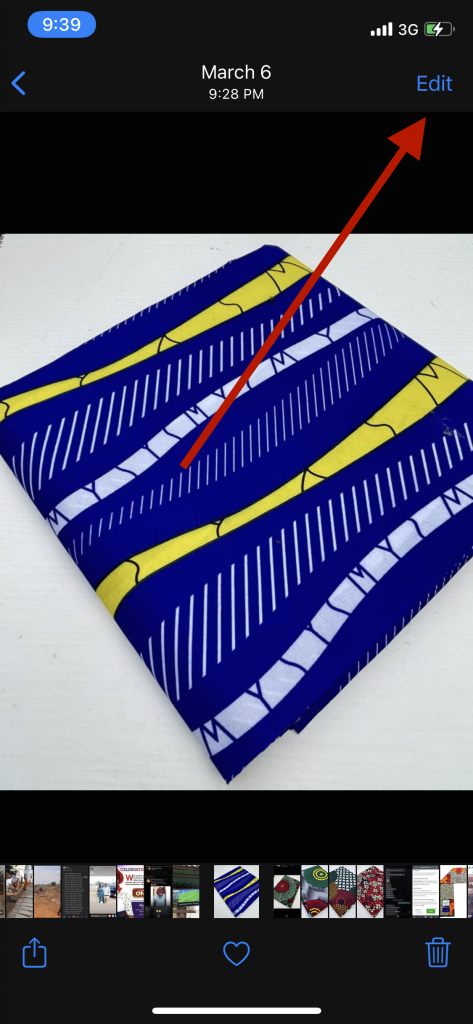
- Select the Edit option after opening the image.

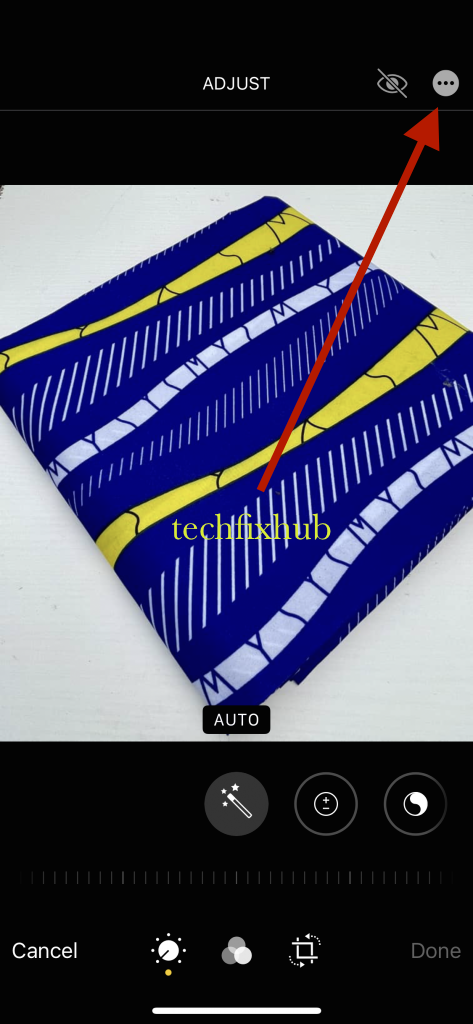
- At the top right corner of your screen, tap on the three dots.

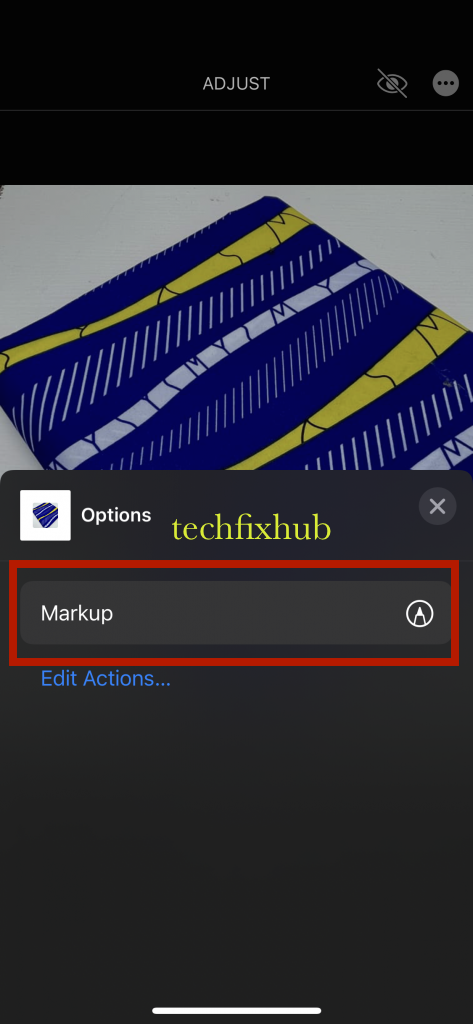
- Choose Markup. This should bring up a plethora of options, allowing you to select several watermarking styles.

- From the resulting menu, choose what kind of watermark you want and how you want it. You can simply choose the Text option to be allowed to write whatever text you want to display on your photos.
- After selecting to add a text watermark, a couple of options will appear underneath, allowing you to change the color of the text. Select the color that best matches what kind of transparent you want and drag the text to the position on the screen.
- Tap Done at the top right corner of your screen and select the Save icon to save your new picture with a transparent watermark.
As hinted above, these steps can be very cumbersome if you have a lot of images to watermark. In that case, you may need something a bit more intuitive and friendlier to use. The following methods will show some perfect iPhone apps for transparent watermarks.
2. Using Watermark Photo
One of the biggest disadvantages of the default markup feature on the Photos app is that you really can’t save your watermark. Each time you need to add credits, you’ll have to recreate your watermark. While that mightn’t sound too cumbersome if your watermark is just text, break this news to those who embed their signatures on every image.
In that case, you’ll need something more robust, and in most cases, slightly more expensive like Watermark Photo. It’s a free app, but if you’re a photographer, consider the premium version of the app, which goes for like $39.99 annually.
The app offers many features that are typically nonexistent in your average iPhone watermarking tool, making it a professional grade. One caveat, however, is the fact that this app will include its watermark in all the photos you edit without paying for a premium subscription.
While it’s a pretty great app, I won’t recommend it to people who aren’t paying for the premium version. If you want a free app, you can either use Photos or the one other recommendation on this list.
3. eZy Watermark Lite
The lite branding on this app may fool you into thinking that it’s not feature-rich, but that’s far from being the case. EZyWatermark Lite may be the free iPhone watermarking app with the most features out there.
The app is free and convenient to use; allows you to watermark multiple images, and you can alter the color and opacity of the watermarks, making them look transparent. Just like its premium counterpart above, eZy Watermark Lite also allows you to create watermark templates to prevent you from designing and redesigning your watermark.
If you want something that lets you watermark multiple photos at once without forcing you to pay for an upgrade, this app is exactly what you’re looking for.
READ MORE: How To Share Photos To WhatsApp On iPhone From Camera Roll
Conclusion
Watermarking photos shouldn’t be a priority for photographers, but sadly, it is. It’s only unfortunate that too many people still don’t understand that they can’t use just any photo on their blogs without permission from the copyright owner.
If you only need to make a transparent watermark for a single photo, the Photos app that comes with your iPhone should be sufficient. Otherwise, you’ll need something far more powerful, like some of the other alternatives listed in this article.

