Is your MacBook camera suddenly not working when you need it most? Whether you’re trying to join a Zoom meeting, attend an online class, record a video, or make a FaceTime call, a faulty MacBook camera can be frustrating and disruptive. This issue is more common than you might think and can be caused by simple software glitches, incorrect app permissions, outdated macOS versions, or even minor hardware problems.
In this guide, we’ll walk you through practical, step-by-step solutions to fix a MacBook camera that’s not working. From quick checks to advanced troubleshooting methods, you’ll learn how to get your camera up and running again without needing immediate technical support.
Where Can I Find My MacBook Camera?
You can always find it right in front of your screen and it automatically turns on whenever you want to use it. We use MacBook cameras for webcam video chat, making a homemade video, or for taking pictures.
Sometimes, your webcam might not function properly. What then do you do?
For Williams, a YouTuber who uses his webcam to record videos for his viewers. He is going to be displeased with his camera, not working as he needs it.
Or let’s take another example Sophia, who uses her MacBook camera to tutor her students when at home. She won’t be comfortable with her MacBook camera not working.
Why Is My Camera Not Working On My MacBook?
How to know if your front camera is not working on your MacBook is when you get the error message “camera is disconnected” or “camera unavailable.” But not to worry, you are going to get your app connected to your web camera.
You might have tried everything you know on your MacBook in other to get your MacBook camera working.
Can My MacBook Settings Be Configured?
MacBooks rarely come with their inbuilt settings app. We believe that all programs which use the MacBook camera have their very own configuration settings; including configuring the MacBook.
Although it is believed that most MacBooks do not come with their settings program, you can however check your MacBook camera permissions. This should be the very first step on how to troubleshoot your personal computer.
How to fix MacBook camera not working
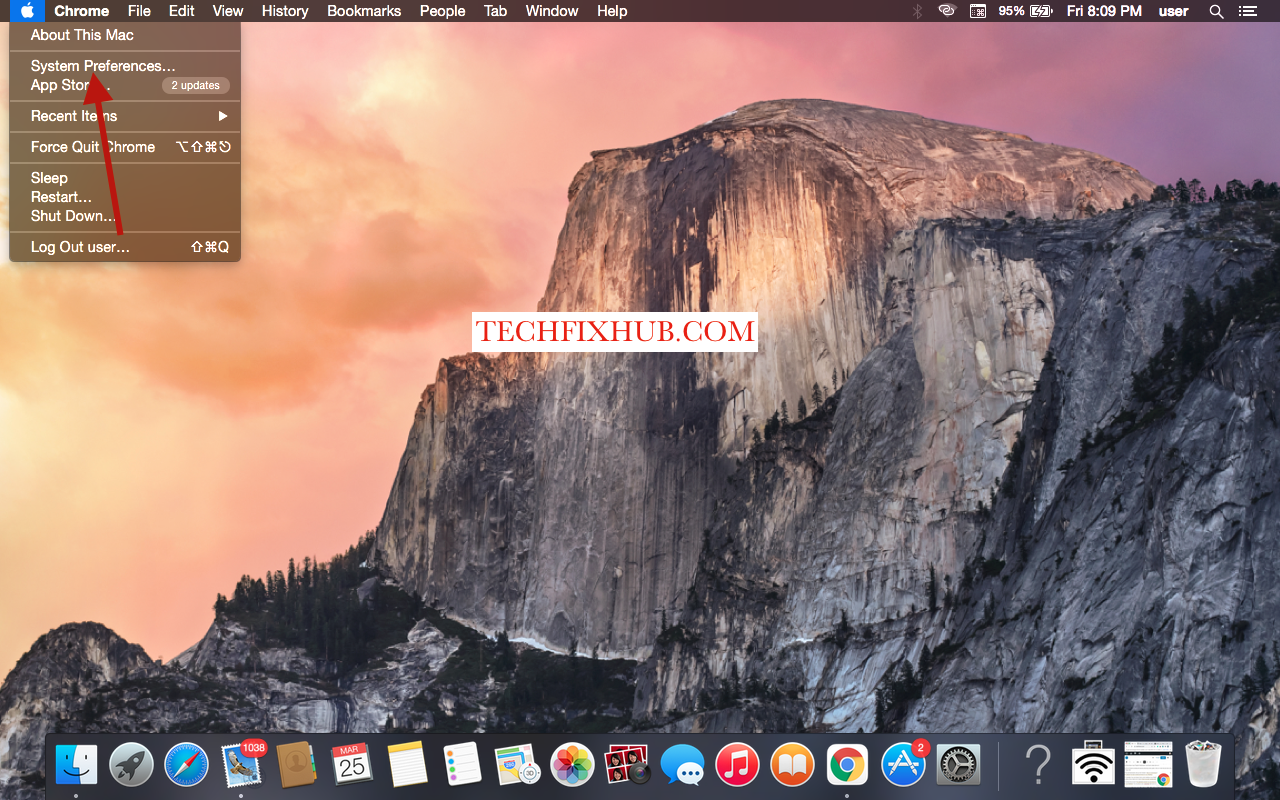
- Switch on your laptop, go to your “Apple Menu” on your MacBook, look at the left edge of your screen and find where it says “System Preferences,” once found, simply click on it.

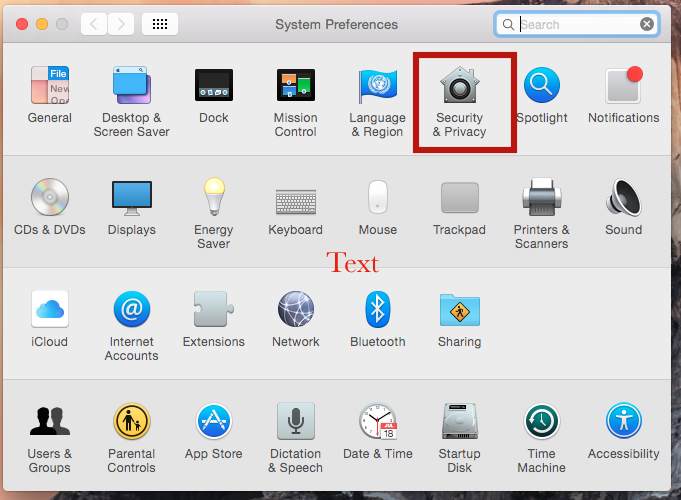
- Now you should try locating the security and privacy menu option and tap on it.

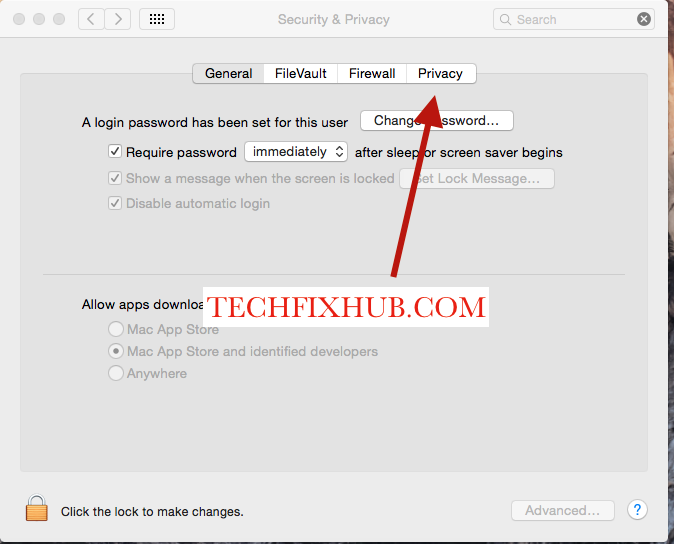
- Then find and click on the “Privacy Tab.”

- Now scroll downwards until you find “Camera”. Click on it and ensure the app you are trying to use for the webcam has been granted permission by your MacBook.
For example, if you are trying to host a zoom meeting on your MacBook and your camera stops working, all you need to do is check if Zoom has been granted permission by your MacBook camera.
How then will you know if the application program you are trying to use has been granted permission by your MacBook? You are going to see a checkmark right next to it ✅
Proven Methods On How To Fix Your MacBook Camera Issues
If your built-in camera isn’t working on your Mac, do note that it could either be a software issue or a hardware issue.
Maybe your MacBook is battling some virus internally or there has been some disarray of programs. It could also be a physical problem, I.e if something had previously tampered with your camera.
If you feel something does not feel right with your MacBook camera, here’s what to do if your MacBook camera stops working
- Method 1: using Terminal With Your MacBook Camera:
There are situations where your app might be used by another app in the background. For example, you might have used your MacBook to access WhatsApp, and you have been in a video chat session. There are cases where MacBook would still use your camera in the background.
As we all know, only one app may use the MacBook camera at a particular time, so it will be an error for 2 apps to use the MacBook camera. So do well to crosscheck, to ensure an app is not using your camera in the background.
Here’s where the terminal comes in, terminal allows you “Stop” programs that are running in the background.
And here’s how; go to your Apple menu and search for Application, click on it. Once you are there, try finding utilities, then click on it. Now look for” Terminal.” Once you’ve found Terminal, you can easily use it to end
And search for Application, click on it. Once you are there, try finding utilities, then click on it. Now look for” Terminal.” Once you’ve found
Terminal, search for the “Terminal window.” Once you’ve found it, programs that are running in the background.
NB; To Fix your MacBook camera with Terminal, Simply go to your Apple menu, click on it and input the command “sudo killall VDCAssistant.”
Once you’ve done the above, simply go back and try using your camera. It will resolve the issue you are facing with your MacBook camera not working.
- Method 2: By Restarting Your MacBook:
Your camera may stop working because there are way too much program running in the background or a particular program is using your camera. Restarting your MacBook is a quick fix to a technical glitch like this one.
You may decide to shut down your MacBook appropriately, then turn it back on after a few seconds or simply restart it.
Shutting down or restarting your MacBook automatically closes all application programs that might have been running in the background and your MacBook camera will get to function well after turning it back on.
To restart your MacBook, simply go to your home page and click on the Apple icon and look for the restart or shutdown button.
- Method 3: Launch Apple Diagnostic Tool:
If, after trying all the above, nothing seems to work on fixing your MacBook camera, simply use the “Apple Diagnostic Tool” to troubleshoot what’s wrong with your camera.
How to use Apple Diagnostic Tool?
- Shutdown your MacBook completely.
- Disconnect every cable and external device like a printer, external mouse, etc. Ensure only your charger is plugged in.
- Then switch on your MacBook while you place your finger on the ‘D’ button on your keyboard. Do not let go of your finger on the ‘D’ button unless you think it has run diagnostic in the background.
READ MORE: How To Clean Out Your Mac To Make It Run Faster
READ MORE: How to fix MacBook Speaker Not Working
Conclusion
Above all, the easiest way to have your MacBook camera working again is by locating the nearest Apple store to you and having it checked, as it might be a hardware issue. Trying to fix a hardware issue with a software solution might not get you anywhere.

