Apple Mail allows you to use multiple email accounts on your iPhone simultaneously. If you don’t want a certain one on the device, it’s pretty easy to delete it from your phone completely. There are no limits to how many emails you can add or delete on an iPhone.
Deleting email apps on your iPhone is an effortless task, although there are certain important information to note before embarking on the process. As long as you can access any part of your iPhone, you shouldn’t face any unsurmountable problems while trying to delete an email account from your iPhone.
To prevent avoidable problems when deleting email accounts, I’ve prepared this guide on how to delete email account on iPhone. With this, you should have no problems deleting any email accounts on your iPhone, as long as the account and the device are both yours.
Things to Note Before Disabling an Email Account
While you may remove email accounts on your device, you may not fully understand the implications. However, understanding these implications is necessary, so you don’t make critical mistakes.
Understand that deleting an email account from your iPhone will wipe out all the contents relating to that email on your device. These contents include the email and folders that are related to the account. Note that this action will happen to all POP, Exchange accounts, IMAP, and accounts configured automatically.
Additionally, you should note that the emails won’t be deleted from the servers of the IMAP, POP, or Exchange accounts. The email app stops accessing the messages and folders, making you unable to send or receive emails from Apple Mail.
Perhaps the most vital aspect to understand is that when you delete an email account from your account, you’re clearing all the contacts, calendars, notes, and other essential files linked to the email.
How to Delete Email Account on iPhone
Before going into the process, it’s essential to note that removing an email doesn’t mean you are deleting the account; instead, you’re only removing it from your device. You can access this account on external email apps or browsers or re-login with the same account on your Apple mail.
I mentioned earlier that you have to go through the settings app rather than the mail app, and this reason is that it’s the iOS that manages email accounts on the mail app.
With these details clear, let’s delve into how to delete an email account from your iPhone.
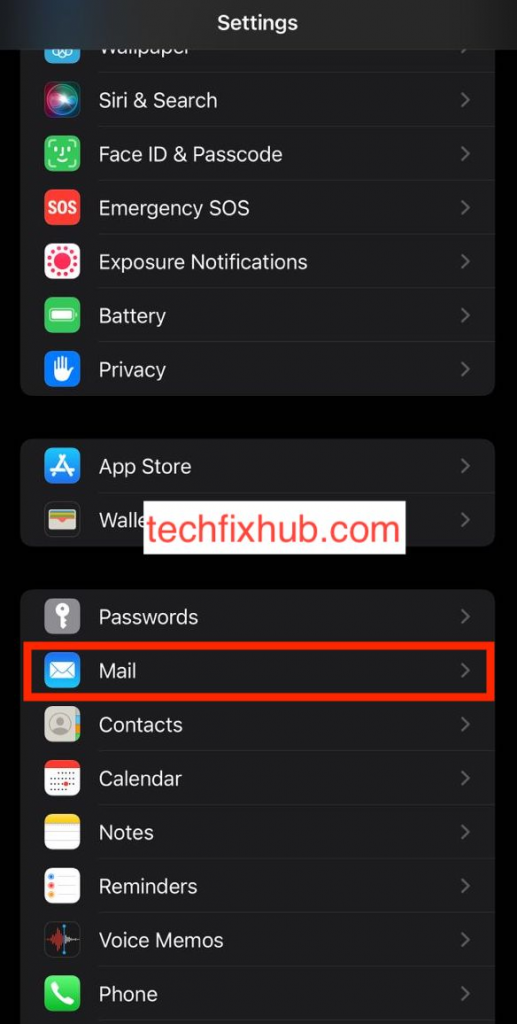
- Go to your iPhone settings
- Select Mail

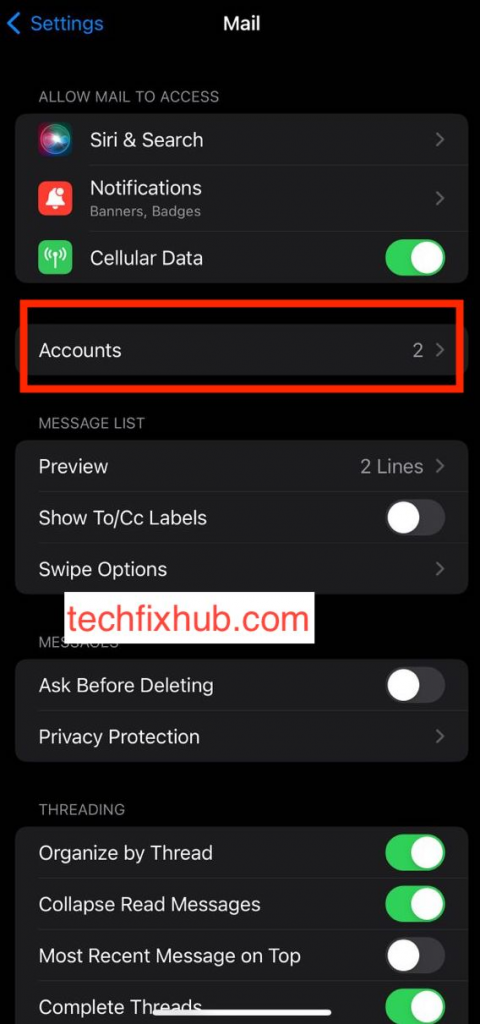
- Go to Accounts

- Select the email account that you want to delete
- Select “Delete Account.”

In some cases, the iPhone will ask you to confirm the action by selecting “Delete from My iPhone.”
That’s you can successfully delete an account from your iPhone. It’s essential to follow these steps to the core, as doing anything other than this might give you non-related results.
Why Can’t I Delete Email Accounts on My iPhone?
You may not be able to delete an account if the content and privacy restriction are enabled. Go to your device settings and tap screen time to fix this issue. Select content and privacy restrictions and set account changes to allow. Tweaking this setting will let you remove an account from your device.
How to Disable Email From Your Account
Earlier in the article, I mentioned that deleting an email account from your phone will also delete all the notes, calendars, and to-do lists associated with the account. However, if you want to remove email without disabling access to calendar and other files, follow these procedures;
- Go to settings and select “Mail,” then “Accounts.”
- Select the email account that you want to disable.
- If you’re using a POP account, turn off accounts. Turn off the main switch for Exchange and IMAP accounts.
Alternatively, you can disable notifications or automatic mail checking for a particular account. When you disable notifications or auto-mail checking, you can still use the email, but the iPhone will hide the alerts from the public’s eye. This idea is an excellent way to mute messages for active accounts.
Like the others, you can also turn off automatic meal checking through the settings app when you follow these steps.
- Go to your iPhone settings app and select “Mail” and “Accounts.”
- Select the “Fetch New Data” option
- Select the Email account that you want to turn off auto-notifications.
- Tap on “Manual.” Note that you’ll have to go through “Schedule” to find “Manual” in older iOS versions.
How to Disable Notifications for New Messages
If you’re uncomfortable getting too many email notifications daily, you can disable email notifications through settings. Although you won’t get notifications alerts, the messages will appear in your inbox where you can read them. Follow these steps to disable email notifications.
- Go to your settings app and select “Notifications.”
- Select “Mail.”
- Choose the email accounts that you want to disable their notifications.
- Turn off the “Allow Notifications” toggle switch.
These steps will disable intrusive email notifications on your iPhone without requiring you to disable each of them manually.
READ MORE: How to Select Multiple Emails in Gmail App to Delete
Conclusion
That’s how to delete an email account from an iPhone successfully. Managing emails on your devices can be challenging if you’re the type that constantly gets your inbox bombarded with messages. However, following the tips above in this article will put you more in control of your iOS mails.
Most of the tips and instructions are for iOS 12 and above. However, you should note that the processes for deleting an account on other iOS versions are very similar to the ones in this article, so you shouldn’t have any problems.
