In this article, you’ll learn how to calibrate monitor to match MacBook pro. If you’ve ever used an external monitor with your MacBook Pro, you’ll notice the stark contrast between the accurate colors on the laptop’s primary display and the relatively inaccurate ones on your external monitor. The only way to fix this discrepancy is by recalibrating the monitor, which is a cumbersome process.
If you use a 13 or 14 inch MacBook Pro, you’ll find the display painfully small for any kind of video or photo editing do on the computer. However, adding an external display will give you a larger screen real estate to work with, albeit at the cost of inaccurate colors.
Provided you have a good monitor, you can always calibrate your external monitor to be as color-accurate as your MacBook Pro. Depending on the make and model of your external display, there’s a chance that it would even look better than your cherished laptop.
How to Configure an External Monitor on a MacBook Pro
Before worrying about calibrating your external monitor to look color-accurate, it’s important to ensure that you’ve properly set up the monitor first. Frankly, most external displays are made for Windows computers and that makes them work unreliably with MacBook out of the box.
However, you can go through some of the advanced display settings in your MacBook Pro’s Preferences utility to ensure that the monitor looks like it created it for the computer. If you don’t know how to configure an external display to work with your MacBook Pro, here is a handy guide.
Follow the steps below to configure an external monitor that’s not manufactured by Apple to work perfectly with your MacBook Pro.
- Connect the external monitor to your MacBook Pro
The first step to configuring your external monitor to work with your MacBook Pro is connecting the two devices. There are several ways to connect a display to a MacBook, but using the HDMI port beside the MacBook Pro is the best way in most cases.
Unless you use a display from the early ’60s, your external monitor should also have an HDMI input port. Simply get an HDMI cable and connect it through the ports on each of your devices, creating a connection between the MacBook Pro and the external monitor.
- • Select the appropriate screen resolution and refresh rate for the display
After connecting the laptop and the external display using an HDMI cable, you can either duplicate or extend your screen. If you choose to extend your screen, selecting a screen resolution would be unnecessary, as the display simply copies the resolution from the MacBook Pro itself.
However, you’ll need to confirm that the computer is using the external monitor to its fullest potential if you’re extending your MacBook Pro’s display using the additional display. You can do this from the Displays menu in your Mac’s System Preferences.
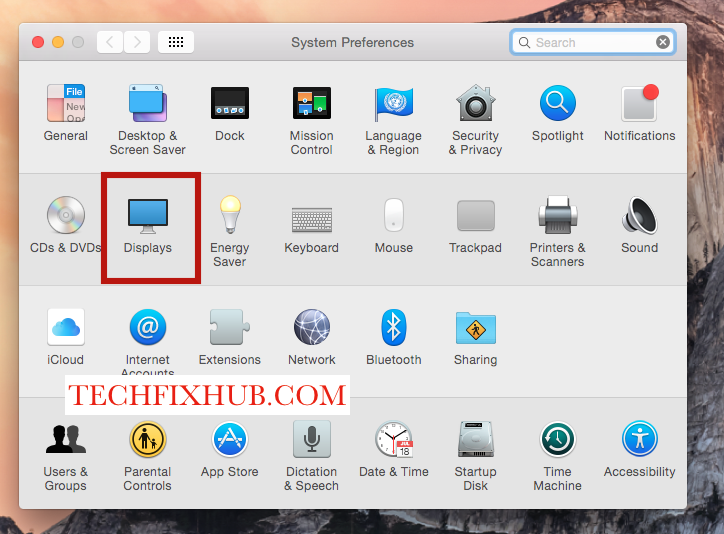
Open System Preferences on your MacBook Pro to get started and select the Displays option. From there, select your external monitors to make the modifications specific to them and select a resolution from the list. Also, click on the dropdown labeled “Refresh Rate” and select whatever’s the highest value.
- Set the external monitor to be the primary display (optional)
If the external monitor offers a better experience than the display that ships with your laptop, use it as the primary monitor each time you connect to the display. Thankfully, you can do that from the display preferences by dragging the menu bar to the image denoting the second display on your MacBook Pro.
How to Calibrate Monitor to Match MacBook Pro
If the colors on your external display look vastly different from what you’re used to seeing on your MacBook Pro, there’s a lot you can do about it. To be fair, it’s almost impossible to get accurate colors right out of the box doing no extra calibration settings.
When calibrating your external display to look roughly the same as your MacBook Pro, you ensure that your laptop has accurate colors. We know MacBook for great colors, but periodic recalibration won’t hurt, especially if you’re using your computer for professional photo or video editing.
Also, you want to ensure that no active display enhancements are active on your MacBook Pro before commencing the operation. Light your room properly to simulate how you’d typically work on your MacBook Pro and set your brightness levels comfortably high for a start.
After following all the instructions up there, follow the steps below to calibrate your monitor to match that of your MacBook Pro.
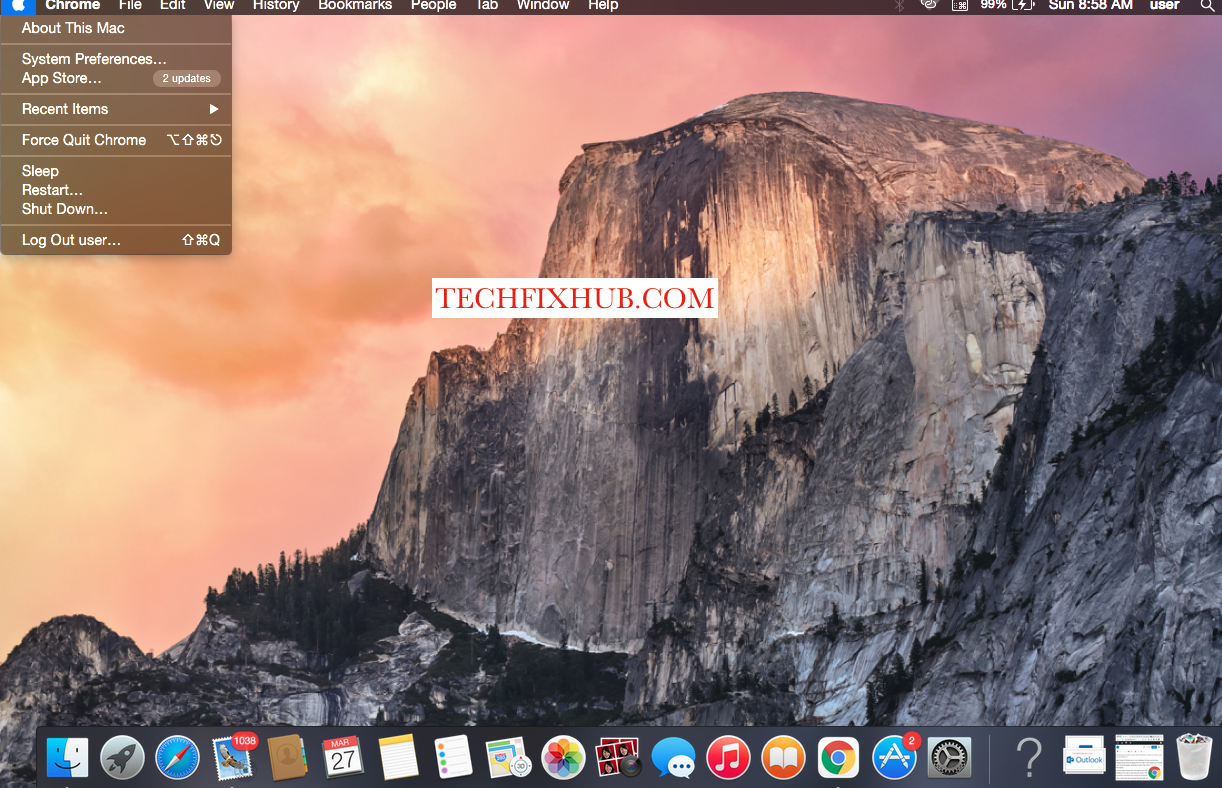
- Open System Preferences on your MacBook Pro like you did when configuring the external display with your Mac. I don’t expect you to close it yet, since the display calibration is part of the configuration steps for a new display.

- Find and select Display from the options and shift your focus from the MacBook Pro screen to the external monitor. Of course, you should have the monitor connected and running fine at this point.
- Open System Preferences on your MacBook Pro like you did when configuring the external display with your Mac. I don’t expect you to close it yet, since the display calibration is part of the configuration steps for a new display.

- Find and select Display from the options and shift your focus from the MacBook Pro screen to the external monitor. Of course, you should have the monitor connected and running fine at this point.
- Open System Preferences on your MacBook Pro like you did when configuring the external display with your Mac. I don’t expect you to close it yet, since the display calibration is part of the configuration steps for a new display.

- Find and select Display from the options and shift your focus from the MacBook Pro screen to the external monitor. Of course, you should have the monitor connected and running fine at this point.

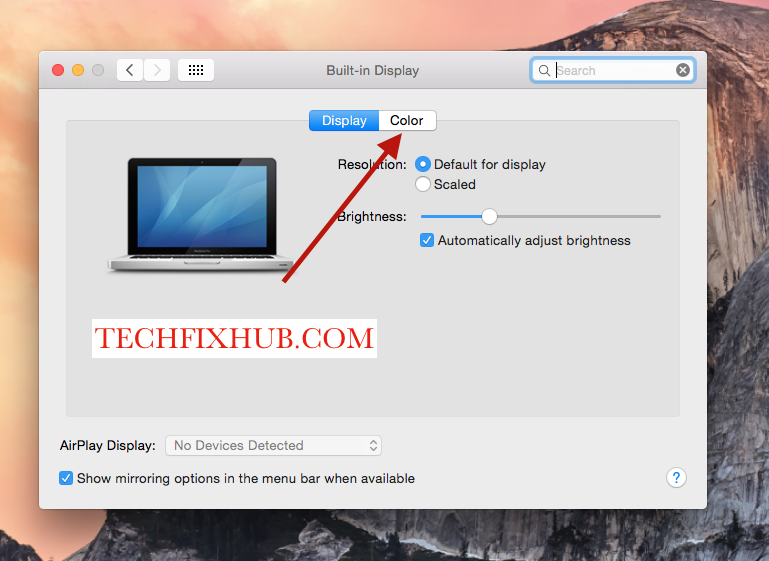
- Click on the Color tab and select the best color profile for you, depending on what you do with your MacBook Pro and how you calibrated your MacBook Pro’s display.

From here, I’ll be leaving you to complete the rest of the steps on your own, since calibrating a display is more of an individual thing. A photo editor may calibrate their external monitor differently from a gamer, making it pretty misleading to show you how I calibrated mine.
You can always delete a display profile if it doesn’t appear to look as good as you wanted it to. There are hundreds of presets on the MacBook Pro that you can select while you try to get your color calibration right.
READ MORE: How To Connect Two Monitors To MacBook Pro
Conclusion
Calibrating your monitor to match the colors on your MacBook Pro is possible if the monitor is of a similar quality to your MacBook’s display. If it is, you can follow the steps in the preceding section to ensure that you’re using the best display settings possible.
Otherwise, simply get a better monitor like the ones Apple makes; they don’t even need any calibration. The last resort that I don’t really like recommending is this: live with it.

